MFSideMenu utilizes view controller containment and gives you a simple
API for implementing side-menu functionality. It integrates with
storyboard-based apps as well as traditional setups.
With its versatile and flexible features, it allows us to easily implement it in our projects.
1. Download the MFSidemenu from https://github.com/mikefrederick/MFSideMenu.
2. Open your project or create a new one for which you want to implement MFSidemenu.
I have created a project named SampleProject. Create a New Group named MFSidemenu.

2. Open MFSidemenu and drag all 7 files from MFSidemenu folder to the newly created folder in your project.

3. Drag SideMenuViewController.h and SideMenuViewController.m file too to your project. Don't worry about the errors , we will resolve them shortly.
4. Import these in your .pch file
#import "MFSideMenu.h"
#import "MFSideMenuContainerViewController.h"
#import "SideMenuViewController.h"
5. Import these Frameworks and import them in your .pch
#import <UIKit/UIKit.h>
#import <CoreGraphics/CoreGraphics.h>
TAG: How to add .pch file.
6. Go to SideMenuViewController.m. It is always a hectic and cumbersome job to modify someone else' code. So delete entire table view datasource and delegate methods from this class.

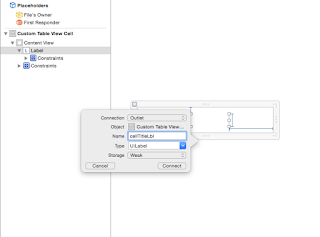
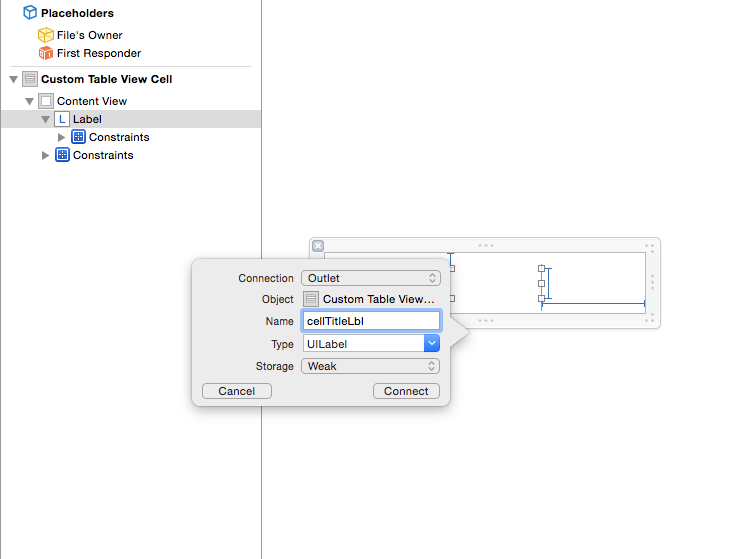
7. we will Customize our side menu cells. So create a New File and name it as CustomTableViewCell (say) and do not forget to select the associated XIB.

8. We will put a label for time being in the custom cell, implement auto layout to it and our cell is ready to be used in the side menu.

TAG: Auto Layout (Table View): Understanding Tricks of Trade Part - II.
9. We will use this cell as our side menu table view cell. Create a viewDidLoad method in
SideMenuViewController.m and register the cell . Set the data source and delegate .
- (void)viewDidLoad
{
[super viewDidLoad];
[self.tableView registerNib:[UINib nibWithNibName:@"CustomTableViewCell" bundle:nil] forCellReuseIdentifier:@"CustomTableViewCell"];
self.tableView.delegate =self;
self.tableView.dataSource =self;
}
10. We need to define table view delegate and data source methods.
- (NSInteger)numberOfSectionsInTableView:(UITableView *)tableView {
return 1;
}
- (NSInteger)tableView:(UITableView *)tableView numberOfRowsInSection:(NSInteger)sectio
{
return 10;//say
}
- (CGFloat)tableView:(UITableView *)tableView heightForRowAtIndexPath:(NSIndexPath *)indexPath
{
return 60;
}
- (UITableViewCell *)tableView:(UITableView *)tableView cellForRowAtIndexPath:(NSIndexPath *)indexPath
{
static NSString *CellIdentifier = @"CustomTableViewCell";
CustomTableViewCell *cell = (CustomTableViewCell *)[self.tableView dequeueReusableCellWithIdentifier:CellIdentifier];
cell.cellTitleLbl.text=[NSString stringWithFormat:@"This Is %ld Row",(long)indexPath.row];
return cell;
}
11. Our side menu is ready now. But we have not yet decided where to implement this side menu and how ?
So decide the view controller which will be the center view controller for side menu, and then when that view controller is called we will call the view controller with side menu . CONFUSED !!!
Don't worry you will be guided through out with examples and snapshots and so you don't face any problem and can help even your friends later.
Let's say we have a method that calls the center view controller , so instead of simply pushing that view controller use this method to call it with side menu, and you will find that center view controller has got the side menu .
Lets say i have a button that calls this method

- (IBAction)OpenSideMenu:(id)sender
{
CenterViewController *nextViewConollerObj = [[CenterViewController alloc]initWithNibName:@"CenterViewController" bundle:nil];
SideMenuViewController *leftMenuViewController = [[SideMenuViewController alloc] init];
UINavigationController *nav = [[UINavigationController alloc] initWithRootViewController:nextViewConollerObj];
MFSideMenuContainerViewController *container = [MFSideMenuContainerViewController
containerWithCenterViewController:nav
leftMenuViewController:leftMenuViewController
rightMenuViewController:nil];
[[UIApplication sharedApplication] delegate].window.rootViewController = container;
}
12. Create a back button on center view controller , but this back button will not just pop view controller but rather on its click it will open the side menu.

- (IBAction)backButtonClicked:(id)sender
{
[self.menuContainerViewController toggleLeftSideMenuCompletion:^{
}];
}
This will open the side menu. Build and RUN the application and if you have done everything the way guided above , the magic happens.

13. We have not yet implemented the did select of the side menu, so without wasting time ,let's do it. We would be directing only the center view controller but example has been provided how to direct to other view controllers. This saves your time, so just copy and paste and fasten the development process.
#pragma mark -
#pragma mark - UITableViewDelegate
- (void)tableView:(UITableView *)tableView didSelectRowAtIndexPath:(NSIndexPath *)indexPath
{
UIViewController *controller;
if(indexPath.row == 0 )
{
CenterViewController *nextViewObj = [[CenterViewController alloc] initWithNibName:@"CenterViewController" bundle:nil];
controller=nextViewObj;
}
else if(indexPath.row == 1)
{
CenterViewController *nextViewObj = [[CenterViewController alloc] initWithNibName:@"CenterViewController" bundle:nil];
controller=nextViewObj;
}
else
{
CenterViewController *nextViewObj = [[CenterViewController alloc] initWithNibName:@"CenterViewController" bundle:nil];
controller=nextViewObj;
}
UINavigationController *navigationController = self.menuContainerViewController.centerViewController;
if(controller)
{
NSMutableArray *array=[[NSMutableArray alloc]initWithObjects:controller, nil];
navigationController.viewControllers=array;
}
[self.menuContainerViewController setMenuState:MFSideMenuStateClosed];
}
After all these we are set to use side menu, but it still do not look good, and when it is about iPhones it should look not just good but GREAT!!!
Associated classes of MFSidemenu contains so many methods that it is a cumbersome process to find the right method for desired modifications. This tutorial will help you saving your time and will make you appreciate the efforts in your comments.
here the CUSTOMIZATION begins:
1. Starting with very basic that we see ,

The gray color do not goes after selection. Add this statement in didSelectRowAtIndexPath delegate method in SideMenuViewController.m
[self.tableView deselectRowAtIndexPath:indexPath animated:YES];
2. We see a black strip at the bottom of the side menu, it does not look good.Does it???
lets remove it.
Go to MFSideMenuContainerViewController.m and find this method
- (void) setLeftSideMenuFrameToClosedPosition
Add this statement after "leftFrame.origin.y = 0;"
leftFrame.size.height = self.view.frame.size.height;
Build and RUN and the gray color and the black color disappears.
3. MFSidemenu has got both right sidemenu and left sidemenu. We can enable both or disable any,
Go to MFSideMenuContainerViewController.m.
Find this method :"- (void)leftMenuWillShow" and change this statement
" [self.leftMenuViewController view].hidden = NO;" to YES if you want to hide .
In the same way ,
Find this method :"- (void)rightMenuWillShow" and change this statement
" [self.rightMenuViewController view].hidden = NO;" to YES if you want to hide .
4. Now its time to customize the menu width, i.e. when the side menu opens , the width of the center view controller can be adjusted and that too by finding this method
"- (void)setDefaultSettings" in MFSideMenuContainerViewController.m and
adding this statement after " self.menuState = MFSideMenuStateClosed;"
self.menuWidth = self.view.frame.size.width - DESIRED WIDTH; // 55 LOOKS GOOD.
5. Now lets customize the table view background and cell color.
Go to SideMenuViewController.m
Add this statement in cellForRowAtIndexPath delegate method
"cell.backgroundColor = [UIColor clearColor];"
and in viewDidLoad method
[self.view setBackgroundColor:[UIColor colorWithPatternImage:[UIImage imageNamed:@"sidemenuImage.jpg"]]];
//IMAGE YOU WANT AS TABLE VIEW BACKGROUND.
BUILD and RUN the application and you will enjoy it this time.

6. You can modify the Lines between Cells, go to viewDidLoad method and add this statement
self.tableView.separatorStyle = UITableViewCellSeparatorStyleNone;
7. You can modify the scroll indiactor of table view, go to viewDidLoad method and add this statement
[self.tableView setShowsHorizontalScrollIndicator:NO];
[self.tableView setShowsVerticalScrollIndicator:NO];
8. You can enable /disable the scrolling of table view, go to viewDidLoad method and add this statement
self.tableView.scrollEnabled = TRUE;
9. You can enable /disable the pan mode of side menu, go to viewWillAppear method of the view controller for which you want to disable the pan mode and add this statement
[self.menuContainerViewController setPanMode:MFSideMenuPanModeNone];
10. Now the most exciting of all PARALLAX EFFECT
Find this method in
- (void) setCenterViewControllerOffset:(CGFloat)xOffset in MFSideMenuContainerViewController.m
and just replace the method by the below method and avoid the hectic task of modifying it
- (void) setCenterViewControllerOffset:(CGFloat)xOffset {
CGRect frame = [self.centerViewController view].frame;
frame.origin.x = xOffset;
float y=40;
if(self.menuState == MFSideMenuStateClosed)
{
frame.origin.y = y;
frame.size.height = self.view.frame.size.height - (2*y);
}
else
{
frame.origin.y = 0;
frame.size.height = self.view.frame.size.height;
}
[self.centerViewController view].frame = frame;
if(!self.menuSlideAnimationEnabled) return;
if(xOffset > 0){
[self alignLeftMenuControllerWithCenterViewController];
[self setRightSideMenuFrameToClosedPosition];
} else if(xOffset < 0){
[self alignRightMenuControllerWithCenterViewController];
[self setLeftSideMenuFrameToClosedPosition];
} else {
[self setLeftSideMenuFrameToClosedPosition];
[self setRightSideMenuFrameToClosedPosition];
}
}
Build and RUN the application you will see what you were searching all the way on google.

11. But why this black patch on top and at down ??? Don't worry we will together remove it or rather hide it .
Add these statements in above method for " MFSideMenuStateClosed"
UIImageView *img=[[UIImageView alloc]initWithFrame:CGRectMake(frame.origin.x, 0, frame.size.width, self.view.frame.size.height)];
img.image=[UIImage imageNamed:@"sidemenuImage.jpg"];
//SAME IMAGE USED AS TABLE VIEW BACKGROUND.
[self.view addSubview:img];
[self.view sendSubviewToBack:img];

Build and RUN the application .
12. SO black patch is gone but we find that some shadow effect, lets customize it ,
Go to MFSideMenuShadow.m file and find this method "- (void)show" add this statement
pathRect.size.height = self.shadowedView.frame.size.height -70 ;
Build and RUN the application and be ready to see the magic .

With its versatile and flexible features, it allows us to easily implement it in our projects.
- Universal device support (iPhone + iPad)
- Universal orientation support (Portrait + Landscape)
- Menus on the left and right side of the screen.
- Storyboard support
- View controller containment
- Works with UINavigationController, UITabBarController, and other types of view controllers
- Nice set of configuration options
- Lightweight, simple and readable code
BUT, those who have implemented or sought to implement it might face some difficulties while customizing it. so without giving a lot more with words let's start to :
How To Implement MFSidemenu ?
1. Download the MFSidemenu from https://github.com/mikefrederick/MFSideMenu.
2. Open your project or create a new one for which you want to implement MFSidemenu.
I have created a project named SampleProject. Create a New Group named MFSidemenu.

2. Open MFSidemenu and drag all 7 files from MFSidemenu folder to the newly created folder in your project.
3. Drag SideMenuViewController.h and SideMenuViewController.m file too to your project. Don't worry about the errors , we will resolve them shortly.
4. Import these in your .pch file
#import "MFSideMenu.h"
#import "MFSideMenuContainerViewController.h"
#import "SideMenuViewController.h"
5. Import these Frameworks and import them in your .pch
#import <UIKit/UIKit.h>
#import <CoreGraphics/CoreGraphics.h>
TAG: How to add .pch file.
6. Go to SideMenuViewController.m. It is always a hectic and cumbersome job to modify someone else' code. So delete entire table view datasource and delegate methods from this class.

7. we will Customize our side menu cells. So create a New File and name it as CustomTableViewCell (say) and do not forget to select the associated XIB.

8. We will put a label for time being in the custom cell, implement auto layout to it and our cell is ready to be used in the side menu.

TAG: Auto Layout (Table View): Understanding Tricks of Trade Part - II.
9. We will use this cell as our side menu table view cell. Create a viewDidLoad method in
SideMenuViewController.m and register the cell . Set the data source and delegate .
- (void)viewDidLoad
{
[super viewDidLoad];
[self.tableView registerNib:[UINib nibWithNibName:@"CustomTableViewCell" bundle:nil] forCellReuseIdentifier:@"CustomTableViewCell"];
self.tableView.delegate =self;
self.tableView.dataSource =self;
}
10. We need to define table view delegate and data source methods.
- (NSInteger)numberOfSectionsInTableView:(UITableView *)tableView {
return 1;
}
- (NSInteger)tableView:(UITableView *)tableView numberOfRowsInSection:(NSInteger)sectio
{
return 10;//say
}
- (CGFloat)tableView:(UITableView *)tableView heightForRowAtIndexPath:(NSIndexPath *)indexPath
{
return 60;
}
- (UITableViewCell *)tableView:(UITableView *)tableView cellForRowAtIndexPath:(NSIndexPath *)indexPath
{
static NSString *CellIdentifier = @"CustomTableViewCell";
CustomTableViewCell *cell = (CustomTableViewCell *)[self.tableView dequeueReusableCellWithIdentifier:CellIdentifier];
cell.cellTitleLbl.text=[NSString stringWithFormat:@"This Is %ld Row",(long)indexPath.row];
return cell;
}
11. Our side menu is ready now. But we have not yet decided where to implement this side menu and how ?
So decide the view controller which will be the center view controller for side menu, and then when that view controller is called we will call the view controller with side menu . CONFUSED !!!
Don't worry you will be guided through out with examples and snapshots and so you don't face any problem and can help even your friends later.
Let's say we have a method that calls the center view controller , so instead of simply pushing that view controller use this method to call it with side menu, and you will find that center view controller has got the side menu .
Lets say i have a button that calls this method

- (IBAction)OpenSideMenu:(id)sender
{
CenterViewController *nextViewConollerObj = [[CenterViewController alloc]initWithNibName:@"CenterViewController" bundle:nil];
SideMenuViewController *leftMenuViewController = [[SideMenuViewController alloc] init];
UINavigationController *nav = [[UINavigationController alloc] initWithRootViewController:nextViewConollerObj];
MFSideMenuContainerViewController *container = [MFSideMenuContainerViewController
containerWithCenterViewController:nav
leftMenuViewController:leftMenuViewController
rightMenuViewController:nil];
[[UIApplication sharedApplication] delegate].window.rootViewController = container;
}
12. Create a back button on center view controller , but this back button will not just pop view controller but rather on its click it will open the side menu.

- (IBAction)backButtonClicked:(id)sender
{
[self.menuContainerViewController toggleLeftSideMenuCompletion:^{
}];
}
This will open the side menu. Build and RUN the application and if you have done everything the way guided above , the magic happens.

13. We have not yet implemented the did select of the side menu, so without wasting time ,let's do it. We would be directing only the center view controller but example has been provided how to direct to other view controllers. This saves your time, so just copy and paste and fasten the development process.
#pragma mark -
#pragma mark - UITableViewDelegate
- (void)tableView:(UITableView *)tableView didSelectRowAtIndexPath:(NSIndexPath *)indexPath
{
UIViewController *controller;
if(indexPath.row == 0 )
{
CenterViewController *nextViewObj = [[CenterViewController alloc] initWithNibName:@"CenterViewController" bundle:nil];
controller=nextViewObj;
}
else if(indexPath.row == 1)
{
CenterViewController *nextViewObj = [[CenterViewController alloc] initWithNibName:@"CenterViewController" bundle:nil];
controller=nextViewObj;
}
else
{
CenterViewController *nextViewObj = [[CenterViewController alloc] initWithNibName:@"CenterViewController" bundle:nil];
controller=nextViewObj;
}
UINavigationController *navigationController = self.menuContainerViewController.centerViewController;
if(controller)
{
NSMutableArray *array=[[NSMutableArray alloc]initWithObjects:controller, nil];
navigationController.viewControllers=array;
}
[self.menuContainerViewController setMenuState:MFSideMenuStateClosed];
}
After all these we are set to use side menu, but it still do not look good, and when it is about iPhones it should look not just good but GREAT!!!
Associated classes of MFSidemenu contains so many methods that it is a cumbersome process to find the right method for desired modifications. This tutorial will help you saving your time and will make you appreciate the efforts in your comments.
here the CUSTOMIZATION begins:
1. Starting with very basic that we see ,

The gray color do not goes after selection. Add this statement in didSelectRowAtIndexPath delegate method in SideMenuViewController.m
[self.tableView deselectRowAtIndexPath:indexPath animated:YES];
2. We see a black strip at the bottom of the side menu, it does not look good.Does it???
lets remove it.
Go to MFSideMenuContainerViewController.m and find this method
- (void) setLeftSideMenuFrameToClosedPosition
Add this statement after "leftFrame.origin.y = 0;"
leftFrame.size.height = self.view.frame.size.height;
Build and RUN and the gray color and the black color disappears.
3. MFSidemenu has got both right sidemenu and left sidemenu. We can enable both or disable any,
Go to MFSideMenuContainerViewController.m.
Find this method :"- (void)leftMenuWillShow" and change this statement
" [self.leftMenuViewController view].hidden = NO;" to YES if you want to hide .
In the same way ,
Find this method :"- (void)rightMenuWillShow" and change this statement
" [self.rightMenuViewController view].hidden = NO;" to YES if you want to hide .
4. Now its time to customize the menu width, i.e. when the side menu opens , the width of the center view controller can be adjusted and that too by finding this method
"- (void)setDefaultSettings" in MFSideMenuContainerViewController.m and
adding this statement after " self.menuState = MFSideMenuStateClosed;"
self.menuWidth = self.view.frame.size.width - DESIRED WIDTH; // 55 LOOKS GOOD.
5. Now lets customize the table view background and cell color.
Go to SideMenuViewController.m
Add this statement in cellForRowAtIndexPath delegate method
"cell.backgroundColor = [UIColor clearColor];"
and in viewDidLoad method
[self.view setBackgroundColor:[UIColor colorWithPatternImage:[UIImage imageNamed:@"sidemenuImage.jpg"]]];
//IMAGE YOU WANT AS TABLE VIEW BACKGROUND.
BUILD and RUN the application and you will enjoy it this time.

6. You can modify the Lines between Cells, go to viewDidLoad method and add this statement
self.tableView.separatorStyle = UITableViewCellSeparatorStyleNone;
7. You can modify the scroll indiactor of table view, go to viewDidLoad method and add this statement
[self.tableView setShowsHorizontalScrollIndicator:NO];
[self.tableView setShowsVerticalScrollIndicator:NO];
8. You can enable /disable the scrolling of table view, go to viewDidLoad method and add this statement
self.tableView.scrollEnabled = TRUE;
9. You can enable /disable the pan mode of side menu, go to viewWillAppear method of the view controller for which you want to disable the pan mode and add this statement
[self.menuContainerViewController setPanMode:MFSideMenuPanModeNone];
10. Now the most exciting of all PARALLAX EFFECT
Find this method in
- (void) setCenterViewControllerOffset:(CGFloat)xOffset in MFSideMenuContainerViewController.m
and just replace the method by the below method and avoid the hectic task of modifying it
- (void) setCenterViewControllerOffset:(CGFloat)xOffset {
CGRect frame = [self.centerViewController view].frame;
frame.origin.x = xOffset;
float y=40;
if(self.menuState == MFSideMenuStateClosed)
{
frame.origin.y = y;
frame.size.height = self.view.frame.size.height - (2*y);
}
else
{
frame.origin.y = 0;
frame.size.height = self.view.frame.size.height;
}
[self.centerViewController view].frame = frame;
if(!self.menuSlideAnimationEnabled) return;
if(xOffset > 0){
[self alignLeftMenuControllerWithCenterViewController];
[self setRightSideMenuFrameToClosedPosition];
} else if(xOffset < 0){
[self alignRightMenuControllerWithCenterViewController];
[self setLeftSideMenuFrameToClosedPosition];
} else {
[self setLeftSideMenuFrameToClosedPosition];
[self setRightSideMenuFrameToClosedPosition];
}
}
Build and RUN the application you will see what you were searching all the way on google.

11. But why this black patch on top and at down ??? Don't worry we will together remove it or rather hide it .
Add these statements in above method for " MFSideMenuStateClosed"
UIImageView *img=[[UIImageView alloc]initWithFrame:CGRectMake(frame.origin.x, 0, frame.size.width, self.view.frame.size.height)];
img.image=[UIImage imageNamed:@"sidemenuImage.jpg"];
//SAME IMAGE USED AS TABLE VIEW BACKGROUND.
[self.view addSubview:img];
[self.view sendSubviewToBack:img];

Build and RUN the application .
12. SO black patch is gone but we find that some shadow effect, lets customize it ,
Go to MFSideMenuShadow.m file and find this method "- (void)show" add this statement
pathRect.size.height = self.shadowedView.frame.size.height -70 ;
Build and RUN the application and be ready to see the magic .

Hope you will not find any difficulty implementing MFSidemenu.
Feel free to post your suggestions and your contribution to improving this tutorial will be highly appreciated .
Thanks for visiting and do help your friends to save their time.
No comments:
Post a Comment